
Prerequisites
-
Machine with supported operating system
-
Internet Information Services (IIS) 10
-
Compatible GENESYS Server version
-
See the GENESYS Installation Guide for GENESYS Server configuration details.
-
-
Valid license for GENESYS Server which includes Sidekick
-
Sidekick licenses are embedded in the GENESYS Sever license. See the GENESYS Installation Guide for details on licensing GENESYS Server. Please contact licensing@vitechcorp.com for licensing support.
-
Minimum Requirements
-
Sidekick is an add-on for GENESYS Server. Sidekick must be installed on the same machine as GENESYS Server. Please refer to the system requirements for GENESYS Server on the software downloads page.
-
GENESYS 2025 Server
-
GENESYS 2026 Server
-
-
Sidekick (in addition to minimum requirements for GENESYS Server)
-
16 GB RAM
-
300 MB hard drive space
-
Client Browser Support (Chromium-based)
-
Chrome/Edge v100+
Licensing via GENESYS Server
Licensing for Sidekick is handled via the GENESYS Server License Utility.
-
To add Sidekick to an existing GENESYS Server deployment:
-
Contact licensing@vitechcorp.com for adding Sidekick licenses to your account.
-
See the section on “Automatically Applying License Updates” in the GENESYS Installation Guide for details on updating your existing GENESYS Server license.
-
-
For new GENESYS Server and Sidekick deployments, Sidekick will be part of the GENESYS Server license. Please see the GENESYS Installation Guide for details on activating a new license after installing GENESYS Server.
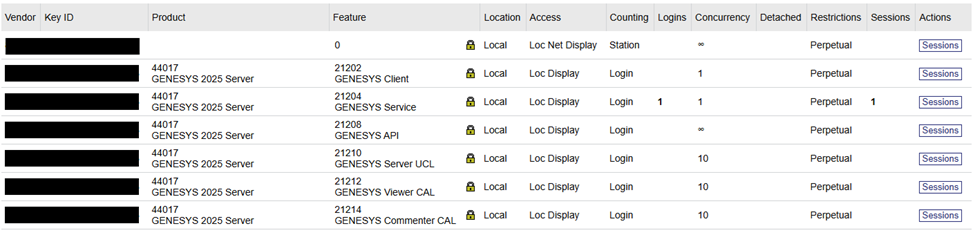
Verify License Activation
Once installed/updated, administrative users can verify the license by navigating to http://localhost:1947 on their server. Sidekick licenses appear as GENESYS Viewer CAL and GENESYS Commenter CAL. Please reach out to licensing@vitechcorp.com with any questions.
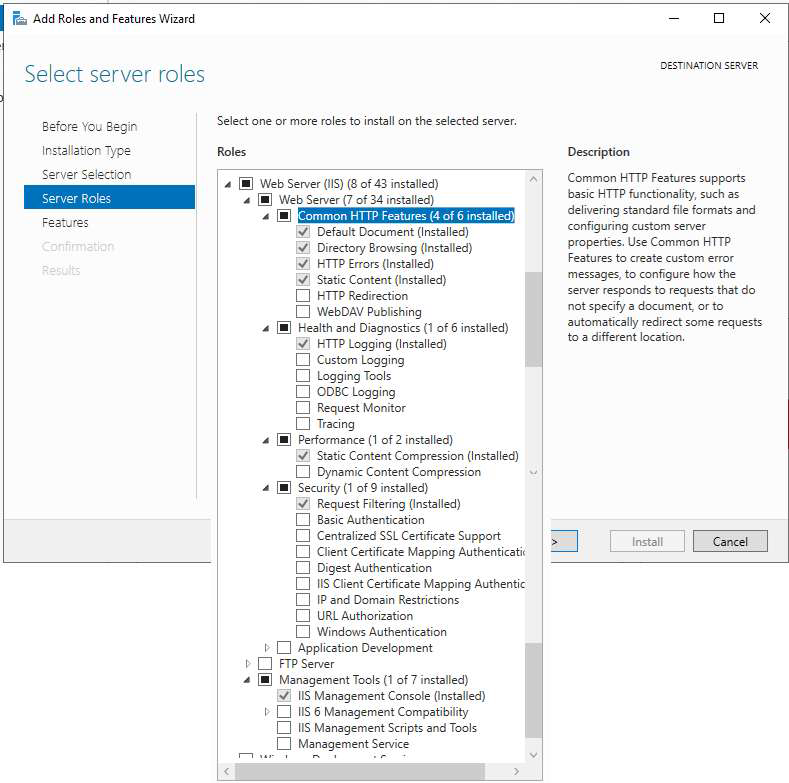
IIS Web Server
-
Verify IIS feature is installed (Start Menu > “Turn Windows Features On/Off”).
-
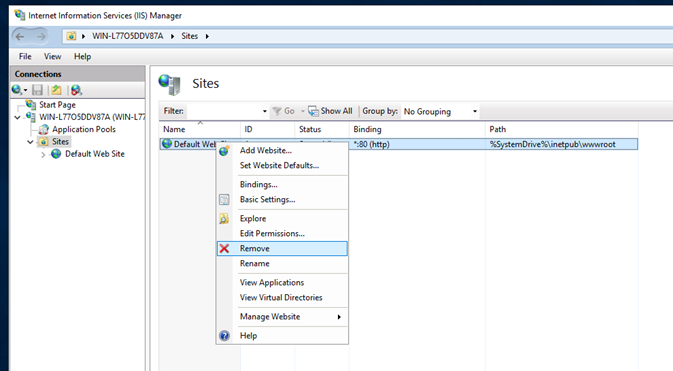
By default, Sidekick will install on port 443 (https). If you have any sites on that port it is required to change the bindings for the initial install
-
Windows Key, search for IIS
-
Open the window
-
Delete the sites.
-
SQL Server
GENESYS and Sidekick require an instance of Microsoft SQL Server (non-Express version). See the GENESYS Installation Guide for SQL Server requirements.
Sidekick Application Installation Steps
-
Download Sidekick installer.
-
Launch installer
-
Install pre-requisites
-
.NET Hosting bundle is required and will be downloaded and installed using the Sidekick installer **internet connection required
-
Manual install link if install machine does not have internet connection
-
-
-
Review licensing agreement
-
Configure SQL server
-
Select SQL instance (usually the same as GENESYS Server)
-
Specify SQL logon credentials using integrated or a specific user
-
By default, Sidekick will use the current user credentials (integrated)
-
Specify a username and password to be validated
-
-
-
Configure IIS
-
Credentials for the Application Pool that Sidekick will run under within IIS will need access to properly execute
-
NETWORK SERVICE account can be used (“yes” option), if chosen it is recommended to specify user credentials for SQL (previous step).
-
-
-
-
Configure Sidekick users
-
Launch GENESYS Server local client
-
Launch Admin Tools dialog by selecting “Utilities” menu from above the GENESYS ribbon and choose the first option “Admin Tools”
-
Navigate to the “Users” tab
-
Click “New User” button to create a user
-
Fill in Username and password sections
-
Confirm password
-
Click “OK” button
-
-
Double clicking the newly created GENESYS user account to launch the User Properties dialog
-
By default, GENESYS requires new users to login and change their password at the initial logon. To avoid issues with Sidekick authentication, it is recommended to either modify the user properties to uncheck the “Change password at next logon” option, or login to GENESYS with the new user before initial Sidekick login.
-
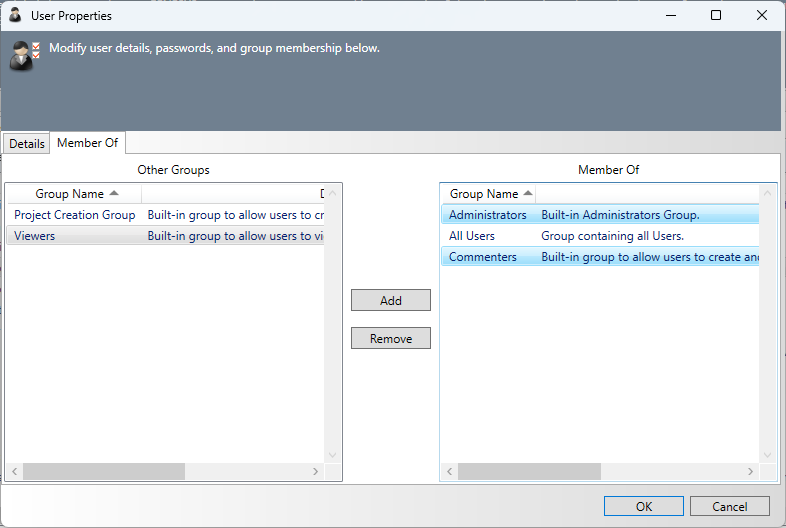
Navigate to the “Member Of” tab
-
Add the Sidekick user to the required groups
-
Sidekick has two groups (Commenters and Viewers) which are shipped with GENESYS Server. Sidekick users must be a part of one of these two groups
-
“Commenters” users can comment on assigned review objects and participate in conversations. They can also interact with application settings according to their roles
-
“Viewers” users can access application contents according to their roles but will not be able to comment, participate in conversations, or interact with application settings
-
To grant a Sidekick user administrative privileges, add them to either Commenters/Viewers as well as the default GENESYS Administrators group.
-
-
Important notes:
-
A Sidekick user must be in the GENESYS Administrators group to create a review and bypass some role-based restrictions in the application.
-
After a user’s login credentials are created in GENESYS, that user must successfully perform an initial login to Sidekick before such user is visible in the application for task assignment.
-
-
-
-
-
Configure GENESYS
-
From the Administrator Tools dialog (3.b.) navigate to “REST API” tab
-
Sidekick assumes GENESYS REST API is http://localhost:8080, this can be reconfigured later in the Sidekick Administration Settings, or before Sidekick has been started the first time; users can modify the appsettings.json from the installation directory to configure the GENESYS REST API Port
-
In the General section the REST interface must be enable (Enabled option set to “True”)
-
In the HTTPS/HTTP section Disable HTTP must be set to “False.”
-
-
-
Launch Sidekick
-
The installer creates a shortcut link “Sidekick Local” (which will launch your default web browser) under the “Vitech” folder of the machine’s Windows Start Menu.
-
-
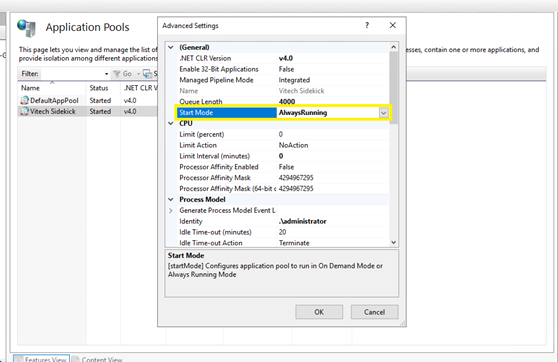
Recommended IIS Configuration
-
Sidekick utilizes services for periodic database updates, set the Application Pool’s “Start Mode” to “AlwaysRunning” to ensure these services can function.
-
Sidekick Upgrade Steps
Sidekick v1.2 Installer will upgrade the existing Sidekick version. It is recommended to backup the Sidekick database prior to installing v1.2. The same installation steps will be followed for upgrading v1.2.
Upgrading Sidekick Clients
When upgrading to v1.2 clients may receive and error message if they haven’t cleared their browser cache. To clear cache follow these steps
-
-
Go to Settings > Privacy > Clear browsing data and select Ctrl+Shift+Del. You can also type "edge://settings/clearbrowserdata" in your address bar to access this function.
Clear your browsing history, cookies, and cached images and files in minutes. You’ll be able to select the dates you want to clear, so you can keep some of your browsing history intact if you’d like.
Remember that clearing data in Microsoft Edge deletes it on any of your synced devices. If you want to avoid this, sign out of your account before clearing your cache and cookies.
-
-
-
At the top right, click More > Delete browsing data.
-
Choose a time range, like Last hour or All time.
-
Select the types of information you want to remove.
-
Click Delete data.
-
If you delete cookies while signed in to Chrome, Chrome refreshes the Google cookies that keep you signed in. This happens so that Chrome can continue to work as you expect. To delete Google cookies, sign out of Chrome first.
-
-
-
-
Click the menu button to open the menu panel.
-
Click History and select Clear Recent History…
-
Next to When:, choose Everything from the drop-down menu, select Temporary cached files and pages in the items list, make sure other items you want to keep are not selected, then click the Clear button.
-
Notes
-
Some Windows machines may report an error “reading setup initialization file” this issue can be resolved by running the installer via Window’s command-line interface
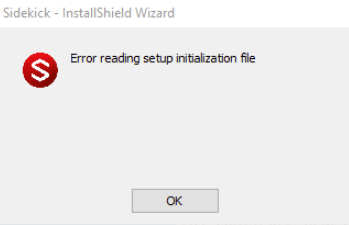
SidekickInstaller /tempextractpath"<path>" where <path> is recommended to be "%localappdata%\Downloaded Installations"
-
Sidekick is designed to work with the GENESYS Server and should be installed on the same server.
-
Sidekick’s default installation is configured with a self-signed HTTPS certificate that is installed on the host machine’s Trusted Root Store.
-
Additional Sidekick documentation is available under the “Vitech” folder in the Windows Start Menu.
-
A link to the localhost site is included in this folder as well.
-
-
Without additional configuration, Sidekick will be available remotely by IP address (e.g. https://localhost) or the FQDN of the hosting machine, but it is recommended to work with your IT group to create/distribute a TLS certificate for your organization.